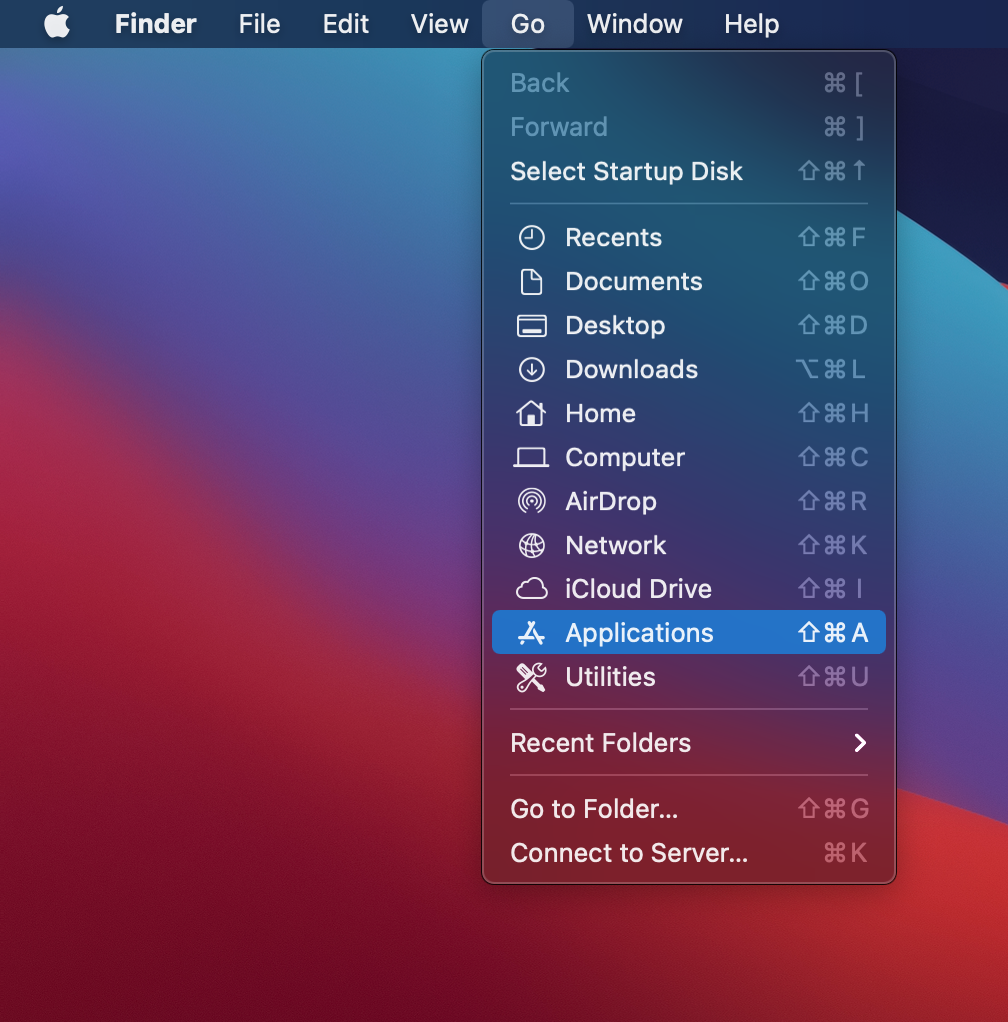
To map a drive on a Mac, open Finder, click Go, select Connect to Server, enter the server address, and choose the Volume to mount. Mapping drives on Mac OS allows for quick access to network storage and shared files.
By following these steps, you can easily set up and use mapped drives on your Mac for efficient file management and access to network resources. Mapping drives simplifies the process of accessing shared folders on local networks and enhances productivity by streamlining file access and organization.
It offers a convenient way to connect to network resources and collaborate with team members seamlessly. Mastering the drive mapping process will enhance your Mac user experience and boost your productivity when working with shared files and network storage resources.

Credit: www.wikihow.com
Understanding Drive Mapping
To map drives on Mac, you can use the Finder app and select “Connect to Server” from the “Go” menu. Then enter the server address and login credentials to establish the connection. This allows you to access and manage remote drives seamlessly on your Mac.
| What is Drive Mapping? | Importance of Drive Mapping for Mac Users |
| Drive mapping assigns a network path to a drive letter for easy access. | Mac users can access network resources conveniently through drive mapping. |
| It simplifies file sharing and allows easy navigation within networks. | Drive mapping enhances efficiency and productivity for Mac users. |
Preparing For Drive Mapping
Before mapping a drive on your Mac, it’s essential to ensure network connectivity. Check your network settings to make sure your Mac is connected properly. Verify that you have the necessary permissions to access the drive. Proper permissions are crucial for a successful drive mapping process.
Once you’ve confirmed network connectivity and permissions, you’re ready to map the drive. Open Finder on your Mac and select “Go” from the top menu. Choose “Connect to Server” and enter the server address. Authenticate with your credentials and select the drive to map. You can now access the drive on your Mac and start transferring files seamlessly.
Remember to always double-check your network connection and permissions. Following these steps will ensure a smooth drive mapping process on your Mac. Happy mapping!
Mapping A Drive
To map a drive on Mac, open Finder and select ‘Connect to Server’. Then, enter the server address and click ‘Connect’. Next, input your login credentials and choose the server volume you want to mount. After that, the drive will appear on your desktop as well as in the Finder sidebar. You can now access the mapped drive and use it for transferring files or accessing resources. It’s a simple process that allows you to conveniently connect to network drives and access their contents on your Mac.
Entering Connection Details
To map a drive on a Mac, you need to enter the connection details. The third step involves entering the server address. This is where you specify the network location you want to connect to. It can be an IP address or a domain name. Once you have entered the server address, you move on to the next step: choosing the volume to mount. This refers to the specific shared folder or drive that you want to connect to. Select the volume from the available options and proceed with the mapping process. By entering the connection details correctly, you will be able to successfully map a drive on your Mac.
Authenticating The Connection
In order to map a drive on Mac, you need to authenticate the connection by entering your credentials. This ensures that you have the necessary permissions to access the drive securely.
Step 5: Enter Credentials
Once you have initiated the drive mapping process, a prompt will appear asking for your credentials. You will need to enter your username and password associated with the drive you are trying to access.
Step 6: Verify Connection
After entering your credentials, click on the “Connect” or “OK” button to verify the connection. The system will then authenticate your credentials and establish a secure connection to the mapped drive. Once the connection is established, you will be able to access and work with the contents of the drive seamlessly.
Credit: confluence.appstate.edu
Accessing The Mapped Drive
Mapping a drive on Mac is a simple process that can greatly improve your workflow. It allows you to quickly access files and folders as if they were located on your local machine. To navigate to a mapped drive, simply open Finder and click on the mapped drive from the sidebar. You can also access the mapped drive by selecting “Go” from the menu bar and choosing “Connect to Server.” Once connected, you can manage the mapped drive by creating new folders, copying files, and organizing your data as needed.
Troubleshooting
| Troubleshooting |
| Common Issues and Solutions |
To ensure smooth drive mapping on Mac, consider checking network connectivity first. Verify the server name and path for proper setup. Restarting the computer and server can resolve many common issues. Double-check permissions and settings for accurate mapping. Use the correct syntax and credentials for authentication. Seek help from IT support if problems persist.

Credit: wikis.utexas.edu
Conclusion
To wrap it up, mapping a drive on a Mac is a simple process that can greatly enhance your productivity. By following the easy steps outlined in this guide, you can easily access and manage network files on your computer.
With this knowledge, you can make the most out of your Mac and streamline your workflow effectively.