To access advanced options in Windows 10, press the “Windows + I” keys to open the Settings app. From there, select “Update & Security” and then choose “Recovery.”
Next, under “Advanced startup,” click on “Restart now. ” Upon restart, choose “Troubleshoot” > “Advanced options” to access various advanced settings such as startup repair, command prompt, and more. Are you a Windows 10 user looking to access advanced options to troubleshoot issues or make system changes?
In this guide, we will walk you through the steps to access the advanced options in Windows 10. Whether you need to repair a startup problem, access the command prompt, or make system changes, the advanced options provide the necessary tools for advanced troubleshooting and configuration. Follow these simple steps to access the advanced options and take control of your Windows 10 system.
Credit: www.isunshare.com
Exploring Advanced Options In Windows 10
Exploring advanced options in Windows 10 allows users to fine-tune various system settings and personalize their computing experience. By accessing advanced settings, users can customize their preferences, tailor system configurations, and optimize performance to suit their specific needs. This guide delves into how to access and navigate the advanced options in Windows 10, offering insights into customizing system preferences and unleashing the full potential of the operating system.
Accessing Advanced Settings
To access advanced options in Windows 10, begin by navigating to the ‘Settings’ menu, which can be found by clicking on the ‘Start’ button and selecting the gear-shaped icon labeled ‘Settings’. Within the ‘Settings’ menu, click on the ‘Update & Security’ option, followed by ‘Recovery’ in the left-hand panel. Under ‘Recovery’, locate and click on ‘Advanced startup’, then select ‘Restart now’ to access the advanced settings menu upon reboot.
Customizing System Preferences
Once within the advanced options menu, users can delve into the various system customization settings available to them. From troubleshooting and recovery options to boot configuration settings, users can personalize their system preferences to align with their specific requirements. For instance, tweaking startup settings, configuring startup repair, and altering firmware settings are just a few ways to harness the potential of the advanced options in Windows 10.
Increasing Productivity With Advanced Features
Increasing productivity with advanced features in Windows 10 can significantly enhance your efficiency and streamline your workflow. By unlocking the full potential of the operating system, you can maximize your productivity. In this article, we’ll delve into the advanced options in Windows 10, focusing on mastering Task Manager functions and utilizing virtual desktops for optimal productivity.
Mastering Task Manager Functions
The Task Manager in Windows 10 is a powerful tool that allows you to monitor system performance, manage startup applications, and troubleshoot unresponsive programs. By mastering the Task Manager functions, you can swiftly identify and resolve issues that may hinder your productivity.
Utilizing Virtual Desktops
Virtual desktops enable you to organize and separate your open windows and applications, helping you to declutter your workspace and maintain a clear focus on tasks. Utilizing virtual desktops can effectively enhance multitasking and improve your overall productivity.
Enhancing Security Measures
Optimizing Windows Defender Settings
Enhanced security means optimizing your Windows Defender settings for maximum protection.
Managing User Account Control
User Account Control management is crucial for protecting your system from unauthorized access.
Credit: www.tenforums.com
Tweaking Performance Settings
Access advanced options in Windows 10 to tweak performance settings and optimize your system for better efficiency. Boost your PC’s performance by adjusting various settings to suit your needs.
Adjusting Power Options
One of the ways to optimize your Windows 10 system for better performance is by adjusting the power options. By customizing power settings, you can control how your computer consumes and conserves energy. This not only helps improve the overall speed and responsiveness of your system, but also prolongs the battery life of laptops.
Here’s how you can adjust power options:
- Click on the Start button in the bottom-left corner of your screen and select Settings (the gear icon).
- In the Settings window, click on System and then select Power & Sleep from the left sidebar.
- On the right-hand side, you’ll find different power settings options. Click on Additional power settings located under the Related settings section.
- A new window will open, showing you the available power plans. Choose the one that suits your needs, or click on Create a power plan to customize your own settings.
- Once you’ve selected or created a power plan, you can further tweak its settings by clicking on Change plan settings.
- Here, you can adjust the time it takes for your computer to enter sleep mode, as well as the amount of time it remains idle before automatically turning off the display or going into hibernation.
- Make sure to click on Save changes after making any modifications to the power plan.
By fine-tuning power options, you can strike a balance between performance and energy conservation, ensuring your Windows 10 computer runs smoothly and efficiently.
Optimizing Visual Effects
Another effective way to enhance performance in Windows 10 is by optimizing visual effects. Windows 10 comes with a range of stunning visual effects that can sometimes take a toll on system resources. Nevertheless, you can disable or modify these effects to improve speed and responsiveness.
Follow these steps to optimize visual effects:
- Right-click on the Start button and select System.
- In the System window, select Advanced system settings located on the left-hand side.
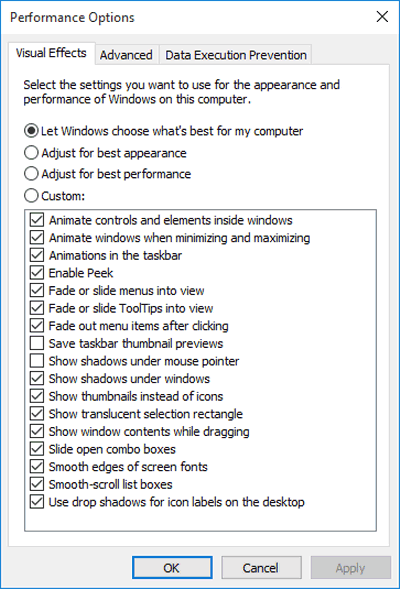
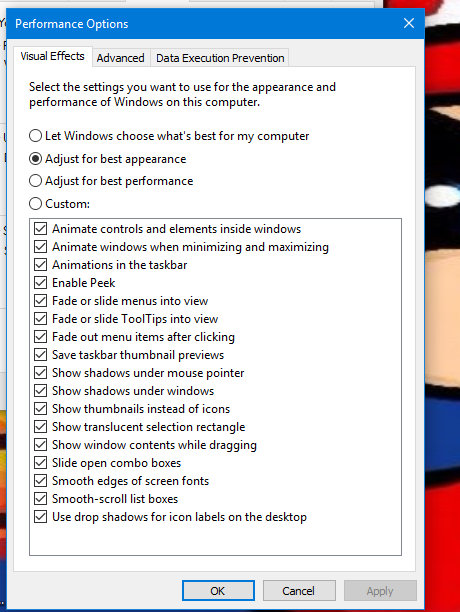
- A new window will appear. Click on the Settings button under the Performance section.
- In the Performance Options window, you will see various visual effects settings. You can either select Adjust for best performance to turn off all effects and choose simplicity over aesthetics or click on Custom to manually enable/disable specific effects.
- If you choose the Custom option, you can go through the list and uncheck the effects you don’t require. For example, you can disable animations, fade effects, and other visual elements.
- Once you’ve made your desired changes, click on Apply and then OK to save the settings.
By optimizing visual effects, you can free up system resources and enhance the performance of your Windows 10 computer, allowing you to enjoy a smoother and more efficient user experience.
Exploring Advanced Troubleshooting Tools
Learn how to access advanced options in Windows 10 and explore the wide range of troubleshooting tools available to solve complex issues efficiently.
Utilizing System File Checker
When it comes to troubleshooting issues on your Windows 10 computer, the System File Checker (SFC) is a powerful tool that can help you fix problems related to corrupted or missing system files. SFC scans the integrity of system files and replaces them if necessary. Here’s how you can utilize this tool to troubleshoot your PC:- Press the Windows key + X on your keyboard to open the Power User Menu.
- Select Command Prompt (Admin) or Windows PowerShell (Admin) from the list.
- In the Command Prompt or PowerShell window, type
sfc /scannowand press Enter. - Wait patiently for the scan to complete. This process may take some time.
- If any corrupt files are found, SFC will attempt to repair them automatically.
- Once the scan is finished, restart your computer and check if the issue has been resolved.
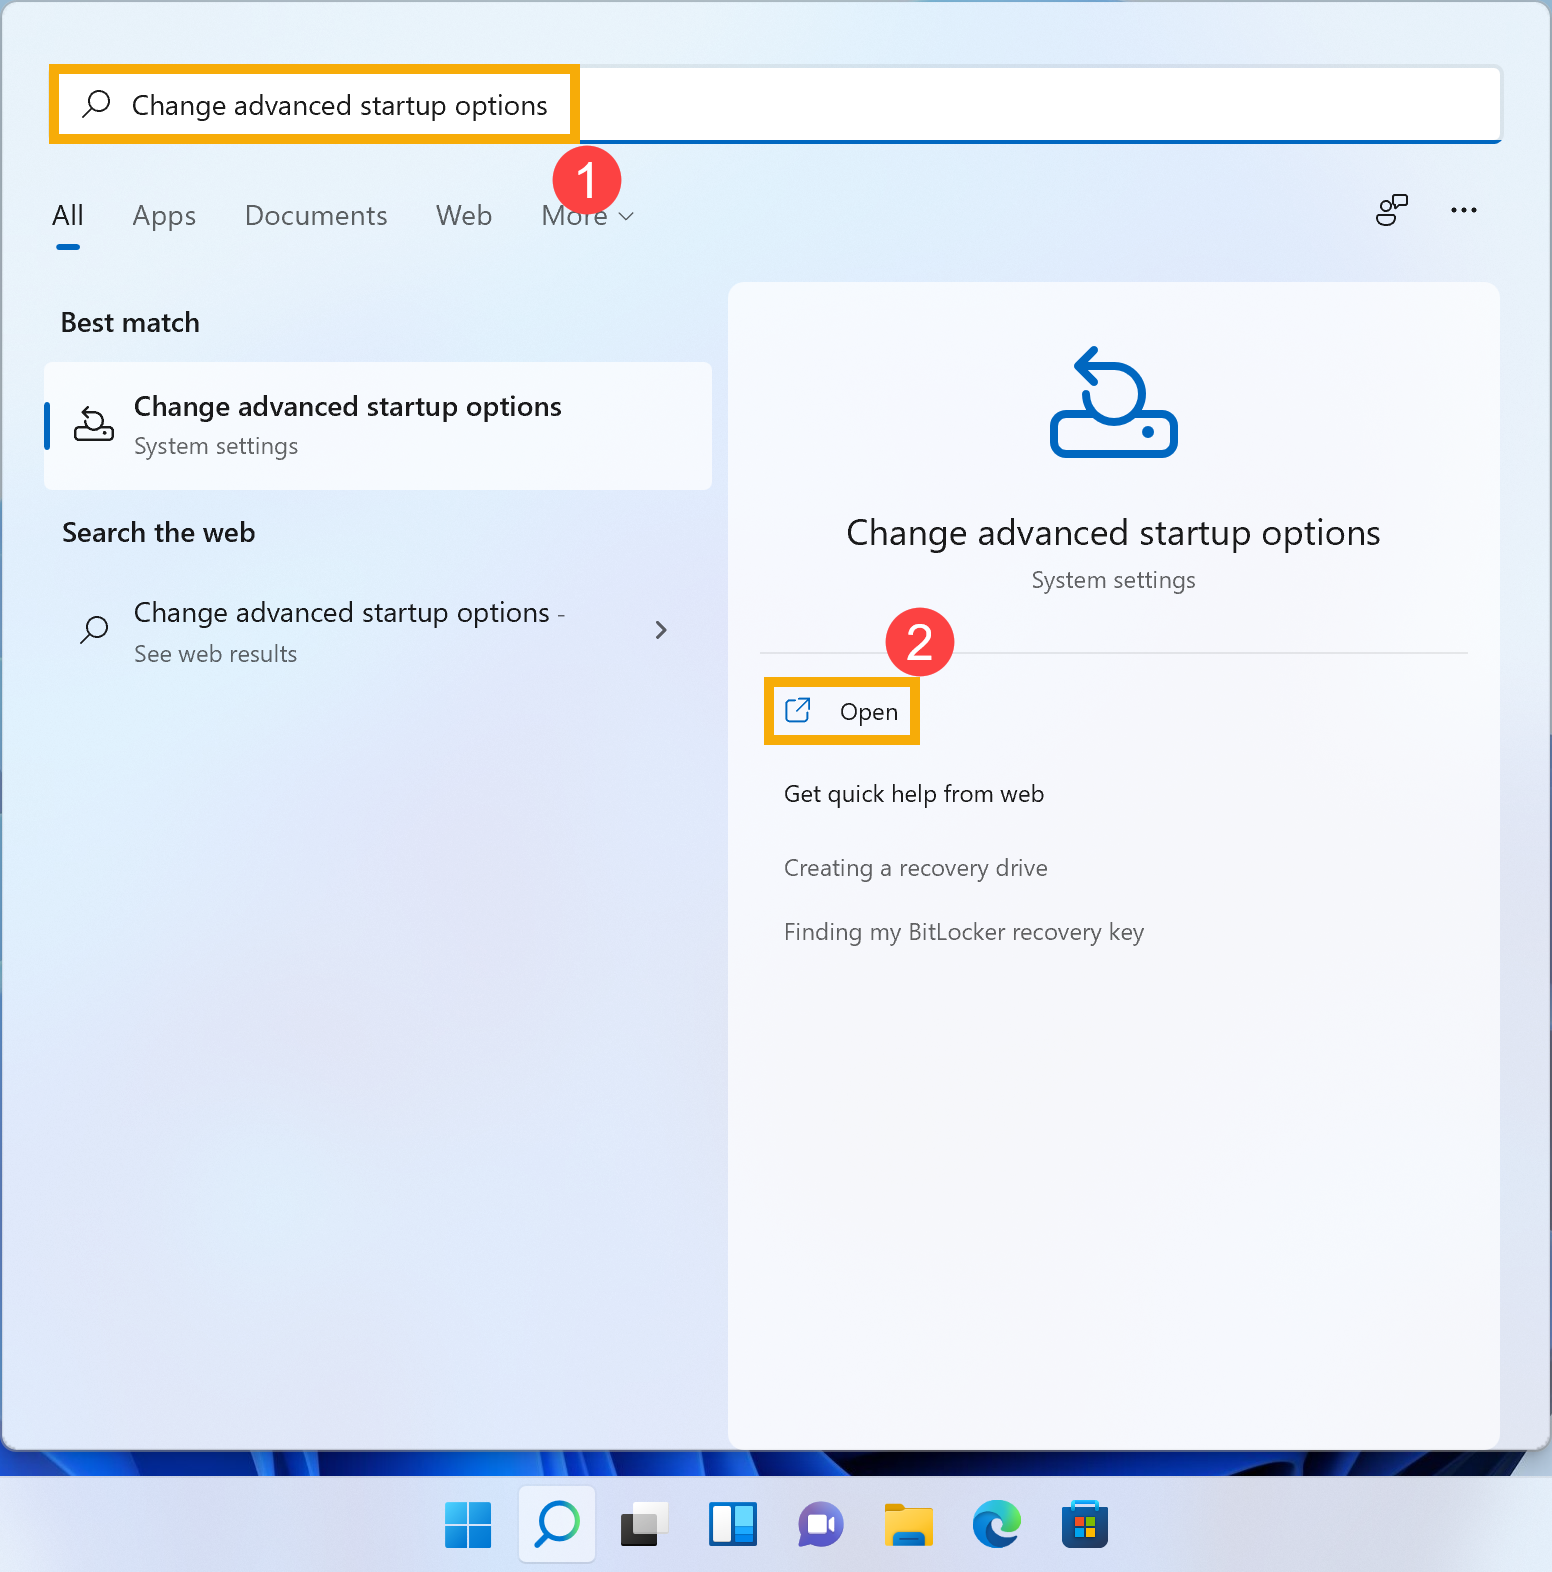
Accessing Advanced Startup Options
If your Windows 10 computer is not booting correctly or encountering issues during startup, accessing the Advanced Startup Options can help you troubleshoot and fix the problem. With these options, you can perform tasks such as repairing the startup process, restoring the system to a previous state, or accessing other troubleshooting tools. Here’s how you can access the Advanced Startup Options:- Press the Windows key + I on your keyboard to open the Settings app.
- Click on Update & Security and then select Recovery from the left sidebar.
- Under the Advanced Startup section, click on the Restart now button.
- Your computer will restart and display the Choose an option screen.
- From here, you can select various options such as Startup Repair, System Restore, or even access the Command Prompt.
- Choose the appropriate option based on the troubleshooting task you want to perform.
Credit: www.asus.com
Networking With Advanced Options
When it comes to Networking with Advanced Options in Windows 10, accessing advanced network settings can optimize your network performance.
Configuring Network Connections
Configuring Network Connections allows you to manage your internet connectivity with precision.
- Customize various network settings for improved performance
- Enable or disable specific features to enhance security
- Troubleshoot connection issues effectively
Utilizing Remote Desktop
Utilizing Remote Desktop feature facilitates seamless access to other computers or servers from your Windows 10 device.
- Establish remote connections with ease
- Control remote devices as if you were physically present
- Increase productivity by accessing resources remotely
Mastering Advanced Customization
Personalizing Start Menu Layout
The Start menu is a central hub for accessing programs and features on your Windows 10 system. Customizing its layout can enhance efficiency and user experience. Here’s how to personalize your Start menu:
- Right-click on the Start button and select “Settings”.
- Go to “Personalization” and choose “Start”.
- Toggle “Show more tiles on Start” to maximize the available space.
- Assign important applications to the Start menu by right-clicking them and selecting “Pin to Start”.
- Arrange and resize tiles to suit your preferences by dragging and dropping.
Customizing Taskbar
The taskbar is an essential navigation tool in Windows 10. Customizing it empowers users to optimize their workspace. Here are some advanced customization options for the taskbar:
- Right-click on the taskbar and choose “Taskbar settings”.
- Adjust the position of the taskbar by selecting “Taskbar location on screen” and choosing a suitable option.
- Customize the taskbar’s appearance by enabling or disabling features such as badge notifications, small taskbar buttons, and more.
- Add or remove toolbars to accommodate specific needs, such as quick access to folders or favorite websites.
- Utilize the “Toolbars” option to add links to desired folders or access additional customized features directly from the taskbar.
Unlocking Hidden Features
Uncover hidden functionalities on Windows 10 by accessing advanced options, elevating your user experience and system performance. Easily navigate through settings to unlock powerful features and customize your operating system to suit your needs.
Unlocking Hidden Features In Windows 10, there are a myriad of advanced options and features that are not readily accessible through the standard settings interface. These hidden features can enhance user experience and productivity. By unlocking these hidden gems, you can unleash the full potential of your Windows 10 system. Below, we’ll explore how to access these advanced options, including enabling developer mode and accessing God mode. Enabling Developer Mode Enabling Developer Mode in Windows 10 opens up a range of advanced options for developers and power users. To access Developer Mode, follow these simple steps: 1. Click on the Start menu and select Settings. 2. In the Settings window, click on Update & Security. 3. Select For developers from the left-hand menu. 4. Under Use developer features, choose Developer mode. Once enabled, Developer Mode allows you to sideload apps and access additional developer settings, empowering you to customize your Windows 10 experience. Accessing God Mode God Mode is a hidden feature in Windows 10 that provides a centralized location for accessing a wide range of system settings and controls. To access God Mode, follow these steps: 1. Create a new folder on your desktop or any other location. 2. Rename the folder with the following text: GodMode.{ED7BA470-8E54-465E-825C-99712043E01C}. 3. The folder icon will change, indicating that God Mode has been activated. By accessing God Mode, you gain access to a comprehensive list of advanced settings and controls, making it easier to manage and customize your Windows 10 system. By unlocking these hidden features, you can take full control of your Windows 10 system, accessing advanced options that can significantly enhance your user experience and productivity. Whether you are a developer or a power user, these hidden features can provide valuable tools and settings, elevating your Windows 10 experience to new heights.Conclusion
Unlocking the advanced options in Windows 10 can significantly enhance your user experience. By following the simple steps outlined in this guide, you’ll be able to navigate these features with ease. Take advantage of the advanced settings to optimize your system and make the most out of your Windows 10 experience.