To format a Toshiba Hard Drive for Mac, use the Disk Utility tool. Connect the drive to your Mac, open Disk Utility, select the Toshiba drive, choose the Erase option, and format it as MacOS Extended (Journaled).
When formatting, make sure to back up any important data to prevent loss. When using a Toshiba Hard Drive with a Mac, ensuring compatibility through proper formatting is essential. By following these steps, you can optimize the hard drive for seamless performance on your Mac system.
Whether for storage expansion or data backup, formatting the Toshiba Hard Drive correctly is crucial for efficient use on your Mac device. Let’s delve further into the process of formatting a Toshiba Hard Drive to enhance your Mac experience.
Understanding Compatibility
Formatting a Toshiba hard drive for Mac is crucial for compatibility. Toshiba hard drives on Mac pose challenges; however, benefits of formatting for Mac outweigh.
Credit: toolbox.iskysoft.com
Preparing For Formatting
It’s essential to back up data before starting the formatting process. Ensure the system meets the requirements for formatting a Toshiba hard drive for Mac. This will help in preserving any important data and avoiding potential loss. Once all data is safely backed up, proceed to check the system requirements to ensure a successful formatting process. Pay attention to each step to avoid any errors or data loss while formatting the Toshiba hard drive for Mac.
Formatting Process
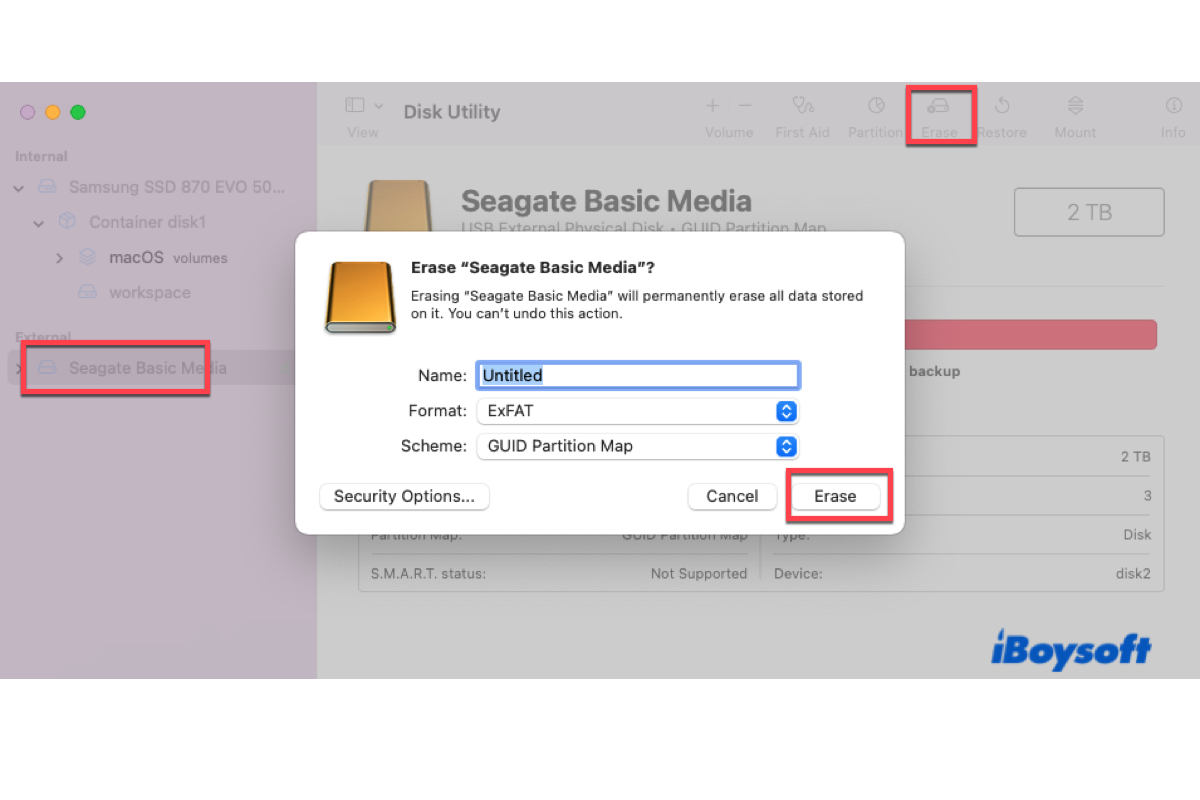
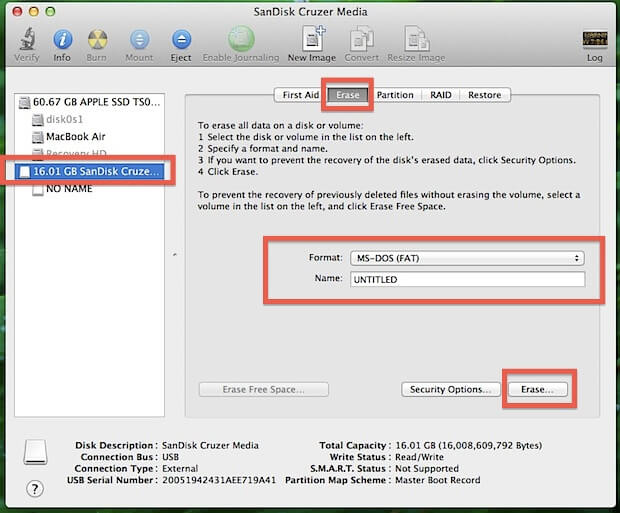
When formatting a Toshiba hard drive for Mac, using Disk Utility is a simple option. Open Disk Utility and select the Toshiba hard drive from the left panel. Then, choose the “Erase” tab and select the file system you want to use, such as APFS or Mac OS Extended (Journaled). Finally, click “Erase” and confirm the action to start the formatting process.
Testing And Verifying
Format a Toshiba hard drive for Mac by testing and verifying compatibility with the operating system. Ensure proper settings for seamless data transfer between the drive and your Mac device. Follow step-by-step instructions to successfully format the Toshiba hard drive, optimizing performance for Mac usage.
Testing and Verifying
To ensure a successful formatting process for your Toshiba hard drive on a Mac, it is crucial to verify compatibility. The first step is to check if your Toshiba hard drive is specifically designed for use with Mac systems. Consult the manufacturer’s specifications or product documentation to find out if the drive is compatible.
Next, you need to determine the file system format of the Toshiba hard drive. Mac systems typically use the HFS+ (Hierarchical File System Plus) or APFS (Apple File System) format. Ensure that your Toshiba hard drive is formatted in one of these formats or can be reformatted to match the requirements of your Mac system.
In addition, consider backing up any important data on the Toshiba hard drive before attempting to format it. This ensures that you don’t lose any valuable information during the formatting process.
Once you have verified compatibility, determined the appropriate file system format, and backed up your data, you can proceed with formatting the Toshiba hard drive for Mac. Following these steps will help you ensure a successful formatting process and optimize the performance of your Toshiba hard drive on your Mac system.
Troubleshooting
Formatting a Toshiba hard drive for Mac can sometimes come with its fair share of challenges. When encountering issues, it is essential to know how to troubleshoot and resolve them effectively.
One common problem users may face is format errors. These errors can occur due to various reasons such as incompatible file systems or damaged partitions. In such cases, it is recommended to use the Disk Utility tool on Mac to resolve the format errors. This tool allows users to repair disk permissions and verify and repair disk errors.
Another common issue is the inability to access or mount the Toshiba hard drive on a Mac. This could be caused by incorrect formatting or a faulty connection. To troubleshoot this problem, users should check the cable connections, try connecting the hard drive to another Mac or USB port, and ensure the drive is formatted correctly for Mac.
By following these troubleshooting steps, users can overcome common issues and successfully format their Toshiba hard drive for use on a Mac.

Credit: recoverit.wondershare.com
Optimizing Performance
To format a Toshiba hard drive for Mac, first, make sure to back up all the data. Open Disk Utility from the Applications folder and select the Toshiba drive. Click on the “Erase” tab, choose the format as “Mac OS Extended (Journaled)”, and name the drive. Click “Erase” to start the formatting process. This will optimize the performance of the drive for Mac. Maximizing transfer speeds can be achieved by using compatible cables and ensuring the drive is connected to a USB 3.0 port for faster data transfer. Improving file management involves organizing files into specific folders and using software like Apple’s Disk Utility to manage and maintain the drive.

Credit: www.nytimes.com
Conclusion
Formatting a Toshiba hard drive for Mac can be a straightforward process. By following the steps mentioned in this guide, you can ensure that your hard drive is compatible and optimized for use with your Mac system. With the right formatting tools and a clear understanding of the process, you can make the most out of your Toshiba hard drive on your Mac.