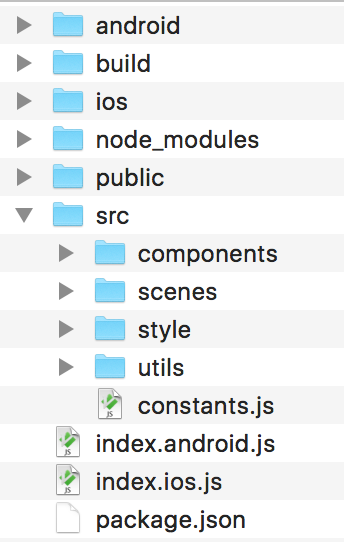
To add Android and iOS folders in React Native, create separate folders for each platform. In Android, place code inside the android folder, and in iOS, put code inside the ios folder.
When developing a React Native app, integrating platform-specific features is essential for cross-platform compatibility. By organizing your code into Android and iOS folders, you can easily manage platform-specific functionalities and configurations. Structuring your project this way ensures efficient development and clear separation of code based on the operating system, simplifying the maintenance process in the long run.
We explore the steps to add Android and iOS folders in a React Native project to streamline your development workflow and optimize platform-specific implementations.
Credit: stackoverflow.com
Setting Up The Project
To add Android and iOS folders in a React Native project, start by creating a new project using the command ‘react-native init ProjectName’. Once the project is created, open it in your preferred code editor. This will allow you to access the project’s files and folders easily, ensuring a seamless setup process.
Adding Android Folder
Create an Android Folder: To organize Android-specific code in React Native, create an Android folder.
Configure Gradle Files: Update Gradle files to specify configuration settings for the Android platform.
Add Required Permissions: Define necessary permissions in the AndroidManifest.xml file for the app to function properly.
Implement Android-Specific Code: Add code that is specific to Android within the Android folder to customize the app behavior.
Adding Ios Folder
To add Android and iOS folders in React Native, begin by creating an iOS folder. Configure iOS files correctly for smooth integration. Ensure to add all required permissions for iOS functionality. Implement specific iOS code to optimize performance and user experience.

Credit: gist.github.com
Testing The Integration
To add the Android folder in React Native, start by navigating to the project directory and then run “react-native run-android” in the command line. This will build and run the Android app on connected devices or emulators.
For building and running the iOS app, open the “ios” folder in Xcode and then select the desired simulator or connected device to build and run the app. It’s important to ensure that the necessary dependencies are installed and configured for both platforms to facilitate smooth integration.
Troubleshooting
Are you facing issues while trying to add Android and iOS folders in React Native? Don’t worry, we’ve got you covered! Here are some common problems you may encounter and their solutions:
1. Incorrect folder structure: Make sure you have created the folders correctly. The Android and iOS folders should be at the root of your React Native project.
2. Gradle build errors: If you encounter build errors related to Gradle, try running cd android && ./gradlew clean to clean the Gradle cache and rebuild your project.
3. Missing files: Sometimes, certain files may be missing from the Android or iOS folders. Double-check that all the necessary files and configurations are present.
4. Version compatibility: Ensure that the versions of React Native, Android, and iOS you are using are compatible with each other. Cross-reference the compatibility matrix to avoid any issues.
5. Third-party library conflicts: Some third-party libraries may cause conflicts between Android and iOS. Verify that the libraries you are using are compatible with both platforms.
By following these troubleshooting steps, you should be able to successfully add Android and iOS folders in React Native without any issues. Happy coding!
Credit: medium.com
Conclusion
Incorporating Android and iOS folders in your React Native app enhances its compatibility and performance. By following the simple steps outlined in this blog post, you can ensure that your app runs smoothly on both platforms. Embracing these best practices will not only streamline your development process but also improve the overall user experience.